
Tag: Solar and Battery

Understanding Your Electricity Bill: What You’re Really Paying For

You open your electricity bill. The number on the front page makes your stomach drop. You think, “How on earth am I using that much power?” When you try to dig into the details, it’s a wall of jargon. Supply charges, time-of-use rates, controlled loads, kilowatt-hours — and then there’s a mystery credit you didn’t expect. It’s hard to tell what you’re actually paying for, let alone whether it’s fair.

To make things worse? Rates have quietly gone up — again. There’s no big announcement, no warning, just a higher price per kilowatt-hour tucked away in the fine print. You feel like you’re being charged more and getting less, without really knowing why.

You’re not alone. Electricity bills are designed to show the information — not explain it. For those who have added solar, it often introduces another layer of complexity to the bill.

At Lenergy, we speak to homeowners every week who are paying too much, not just because they use too much power — but because they don’t fully understand what they’re being charged for, or how to check it. Often, they’ve already taken steps to reduce usage or install solar, yet they still feel like they’re still paying more than they expected.

In this guide, you’ll learn how to read your electricity bill with confidence.
We’ll show you exactly what to look for — step by step — with visual examples to help you follow along. Whether you have solar or not, you’ll understand what each charge means, why your bill fluctuates across the year, and how to spot red flags — such as sneaky rate increases.

Why Electricity Bills Feel So Confusing

Most electricity bills are designed for accountants, not everyday homeowners. They’re packed with technical terms, hard-to-follow tables, and totals that don’t tell the full story. Even if your usage is consistent, your bill can still go up — and you’re left wondering what changed.

A big part of the confusion comes from how energy is priced. You’re not just paying for how much electricity you use. You’re also paying:

  • A daily supply charge just to be connected to the grid
  • Different usage rates depending on when you use power (peak, off-peak, shoulder)
  • Extra costs or credits if you have solar
  • And sometimes, sudden rate increases that aren’t clearly flagged

Then there’s the issue of how you pay. Many households are on weekly or fortnightly direct debits — and while this can make bills feel more manageable, it can also mask how much you’re actually spending. The payments feel small, but the total across a billing cycle (especially quarterly ones) can be surprisingly high.

It’s no wonder people look at the “Amount Due” on the front page and feel blindsided. It might include weeks of backdated charges or spread across a long billing period. If you’re not tracking your usage or the rising rates underneath, it’s easy to miss the bigger picture.

If you’ve ever thought, “My usage hasn’t changed, but my bill has,” — this section will explain why.

What to Look for When You Open Your Bill

Before you start scanning rows of numbers or wondering what a kilowatt-hour actually costs — pause. The most useful thing you can do with your electricity bill is to start with four key metrics. These tell you how your charges are calculated, how long they cover, and whether anything looks off.

Here’s what to look for:

Billing Period

This tells you the exact dates the bill covers. Some people get billed monthly, others quarterly. If you don’t notice this upfront, it’s easy to misjudge how high your bill really is.

An example electricity bill from Lenergy highlighting the billing period with a Lenergy logo watermark

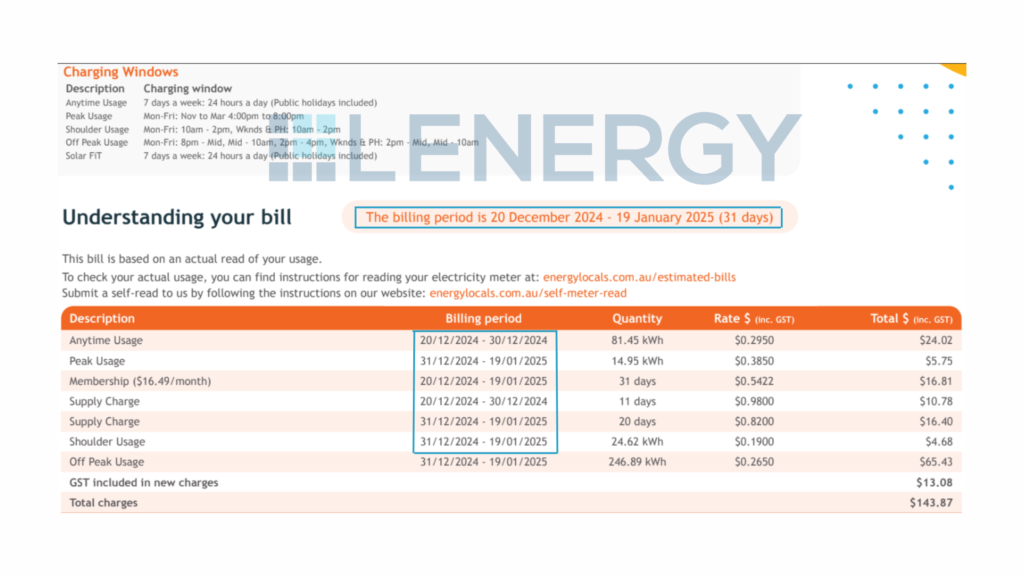
Always double-check how many days your bill is spread across. A $500 bill might seem massive — until you realise it’s covering 90 days, not 30.

Average Daily Usage

This shows how much electricity you use on an average day, usually in kilowatt-hours (kWh). It’s one of the easiest ways to track whether your usage is changing — especially useful across seasons.

An example electricity bill showinf rhw average daily usage with a Lenergy logo watermark

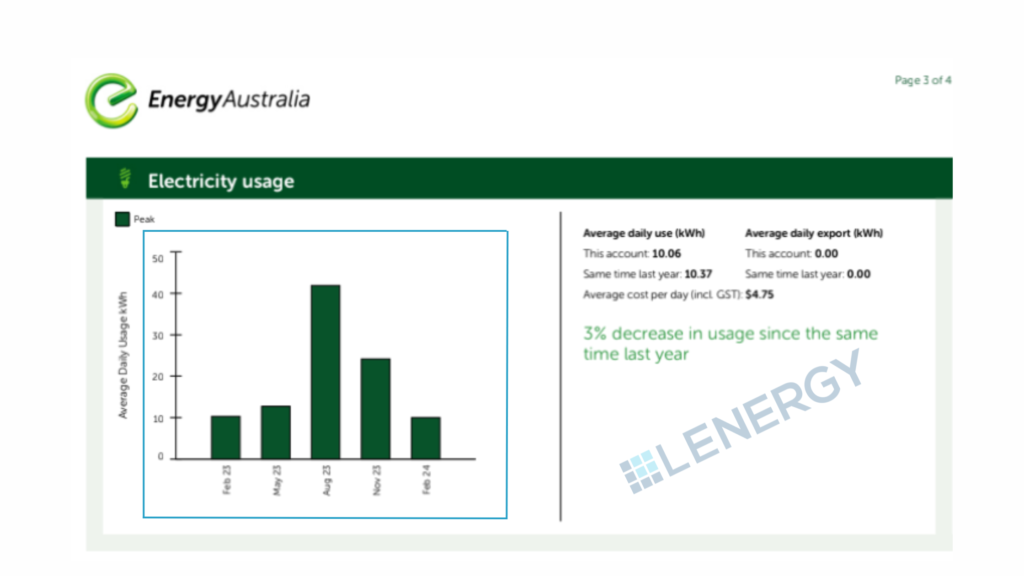
Compare this to your past bills to spot trends. Some retailers also compare your usage to “similar homes” — which can be helpful, but take it with a grain of salt.
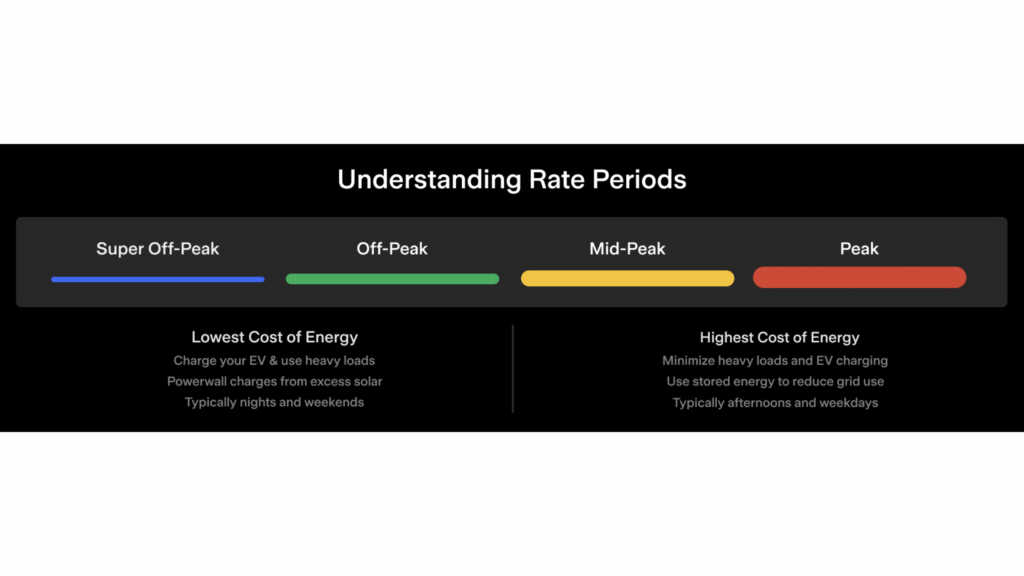
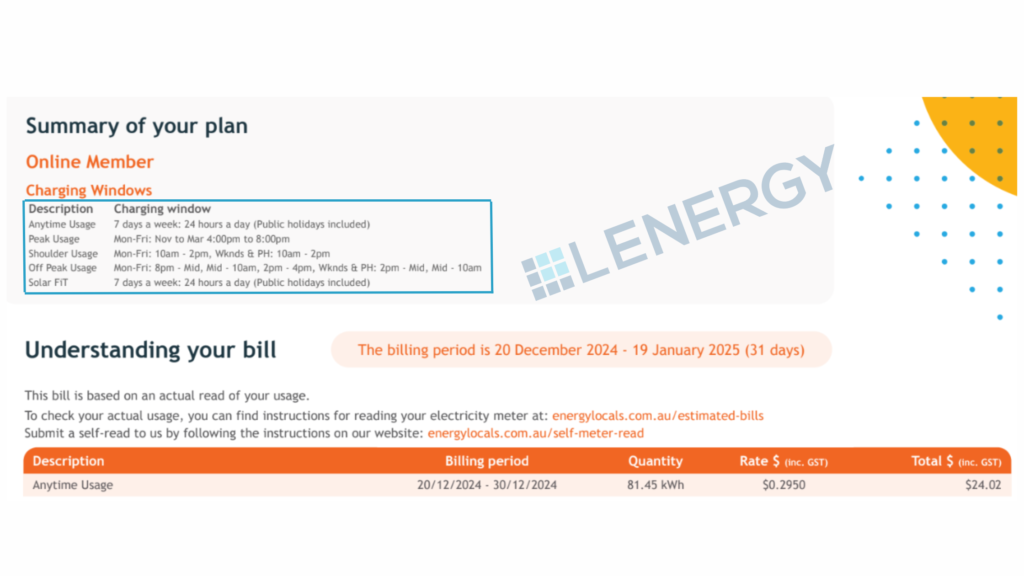
Usage Rates

You might be paying different rates for electricity depending on when you use it:

  • Flat rate: One rate for all hours
  • Time-of-use (TOU): Higher rates during peak hours, lower off-peak
  • Shoulder rates: Mid-tier pricing between peak and off-peak periods
  • Controlled load: A separate rate for specific appliances like electric hot water systems, usually at night
An example electricity bill from Lenergy showing the peak usage, shoulder usage and off peak usages

Understanding your rates helps you match your habits. If you’re on TOU pricing and running appliances during peak times, your costs can climb quickly — even if your usage is low. Knowing when shoulder and off-peak periods apply can help you shift usage and save.

Daily Supply Charge

This is a fixed amount you pay every day just to be connected to the grid — even if you use no electricity at all.

It’s usually listed separately to usage rates and often surprises people. Multiply it by the number of days in your billing period to see how much it really adds up to.

An example electricity bill from Lenergy highlighting the Service to property charge with a Lenergy logo watermark.

Learning to spot these four things takes just a minute — but it gives you a clearer picture of what you’re really paying for.

Breaking Down the Metrics: What You’re Actually Being Charged For

Once you’ve found the basics — billing period, usage, supply charge, and rates — the next step is understanding what all those line items on your bill actually mean. This section gives you a simple breakdown of the most common charges and credits you’ll see.
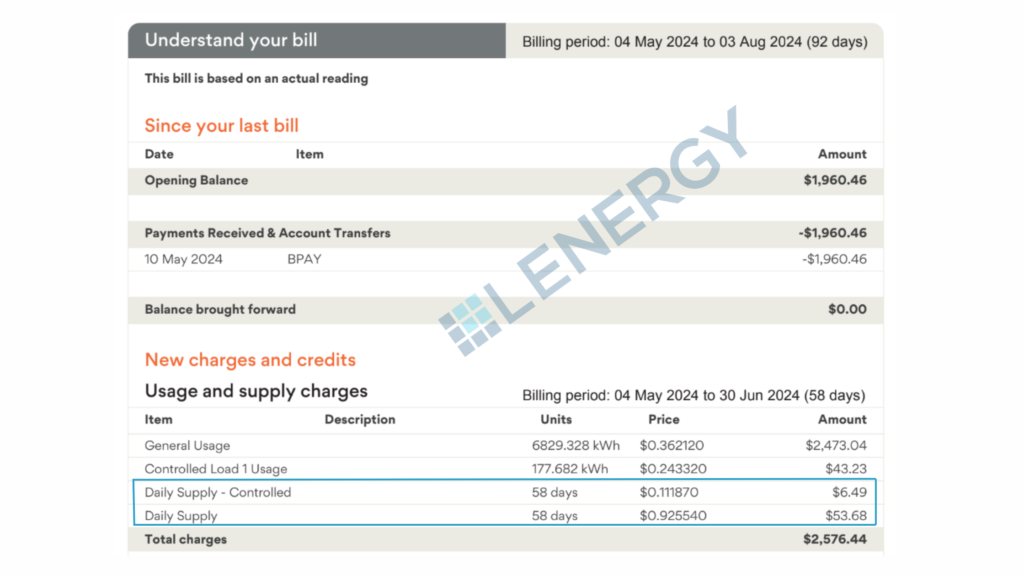
Daily Supply Charge

This is a fixed fee just for being connected to the electricity grid — it’s charged per day, no matter how much or how little power you use. It usually ranges from 90 cents to $1.30 per day depending on your plan and provider.

If your bill covers 90 days, and your supply charge is $1.10/day, that is adding $99 in connection fees alone to your bill — before accounting for a single kilowatt-hour of energy.


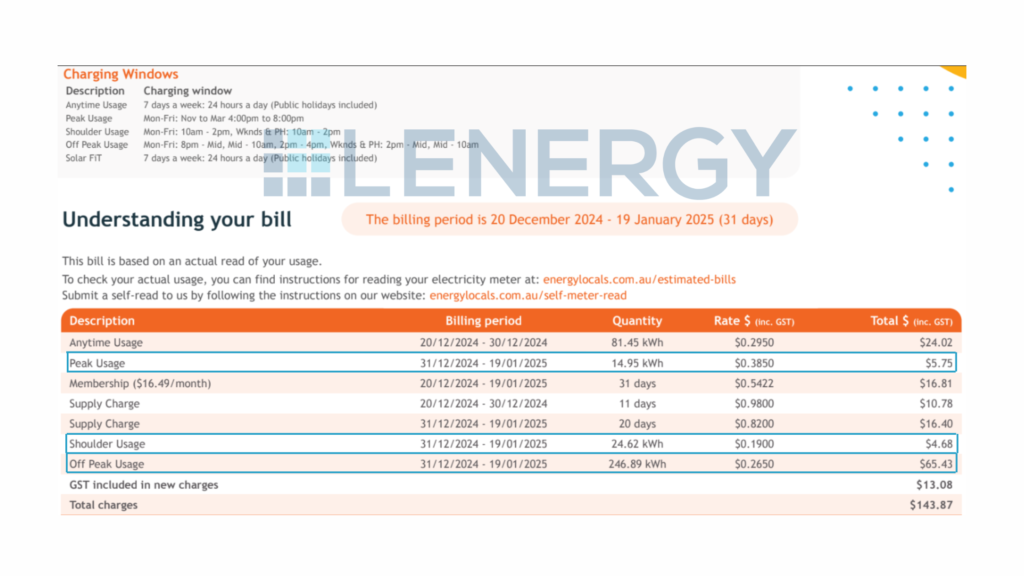
Some plans — especially controlled load and time-of-use (TOU) tariffs — may include additional daily supply charges for each metering configuration. For example:

  • If you have a controlled load for your electric hot water system, you might see a second supply charge just for that meter.
  • Some TOU plans may break out supply charges per rate type or meter, depending on your setup.

This means your fixed daily charges could include two or even three separate daily supply fees — and they all add up.

An example Lenergy electricity bill highlighting the daily supply and daily supply controlled.

Usage Charges

This is the part of your bill based on how much electricity you actually use, measured in kilowatt-hours (kWh). You might see one flat rate, or several rates depending on your pricing structure:

  • Peak rate: Highest rate, usually weekday afternoons and evenings (e.g. 4–9 pm)
  • Shoulder rate: Moderate pricing, often mornings or mid-day periods
  • Off-peak rate: Cheapest rate, usually overnight or weekends.
    Some providers are now introducing midday off-peak rates due to high levels of solar generation feeding into the grid. This reflects a broader shift in how energy is priced — and new options like solar sharing schemes are also starting to emerge.
    You can read more about that here.
  • Controlled load: A lower rate for specific appliances like electric hot water systems, usually metered separately and run at off-peak times.
An example electricity bill from Lenergy highlighting the charging window with a Lenergy logo watermark.

Understanding how your rates work helps you make smarter choices about when to run power-hungry appliances — and can help you avoid using electricity during the most expensive times of day.

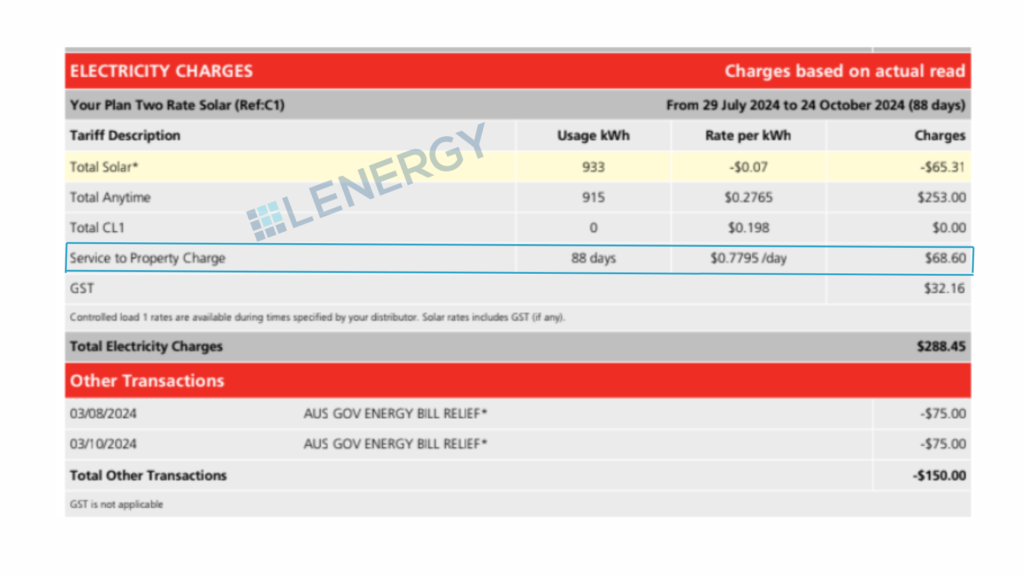
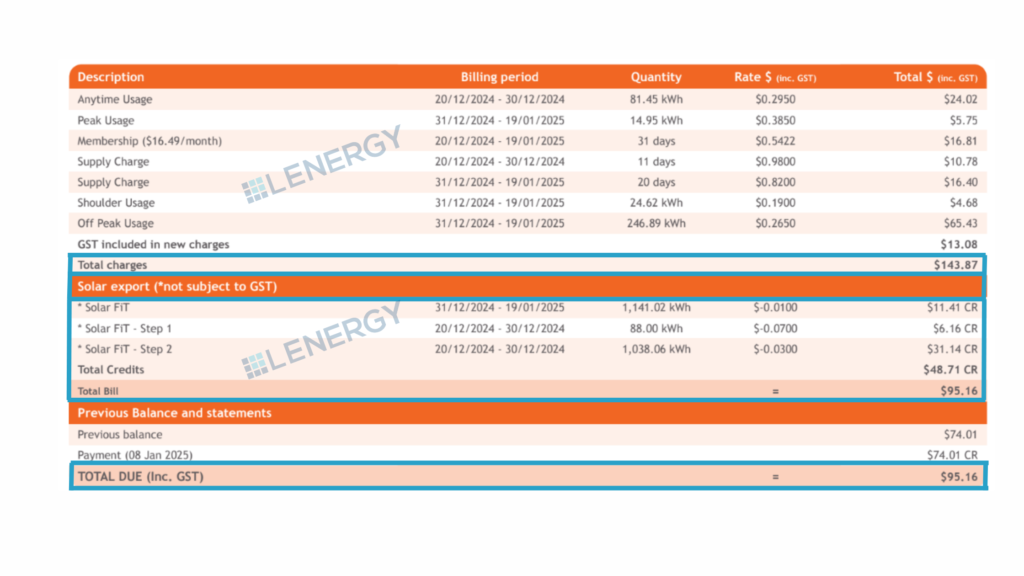
Solar Feed-in Credits (for solar households)

If you have solar panels, any excess power your system exports to the grid is credited to your bill at a “feed-in tariff” — usually between 0 and 7 cents per kWh.

This will appear as a line item or section on your bill, often labelled “solar export” or “feed-in credit.” It’s subtracted from your total charges, not paid out in cash unless you’re in credit.

It’s important to note: just having solar doesn’t mean your bill will be zero. You still pay for any grid power you use outside solar hours — and your daily supply charge still applies.

An example electricity bill from Lenergy showing feed-in credits and how they offset usage.

Other Items You Might See

Depending on your provider and plan, you might also notice:

  • GreenPower charges (if you’ve opted in to pay for renewable energy)
  • Metering fees (for remotely read smart meters)
  • Credit adjustments or late payment fees
  • Government rebates or concessions, if applicable

Each of these should be listed with clear labels — but unfortunately, that’s not always the case.

How Solar Affects Your Bill (And What to Watch Out For)

If you’ve installed solar panels, you probably expected a sharp drop in your power bills — maybe even a $0 balance. However, for many households, the first post-solar bill brings a surprise: you’re still paying more than expected. Here’s why that happens, and how to read your bill correctly with solar in the mix.

You Still Use Grid Power — Just Not as Much

Your solar system generates power during the day, and when you’re using electricity at the same time, your home will use that solar power first. This is where most solar savings actually come from — because you’re avoiding buying electricity from the grid at full retail prices.

However, your electricity bill does not show this self-consumed solar energy. The bill only records what passes through the meter:

  • Electricity you import from the grid
  • Electricity you export back to the grid

So while your solar system may be powering much of your home during the day, that benefit happens “behind the meter” and isn’t visible as a line item. The charges you see are simply the remaining gap — the grid power you still need at night, during poor weather, or during high-usage periods.

Feed-in Tariffs Don’t Show the Full Picture

Any unused solar energy is exported to the grid and credited at a feed-in tariff (FiT). These rates are typically much lower than what you pay to buy electricity — often around 0–7 cents per kWh compared to 30–50 cents per kWh for usage charges.

Because your bill only shows exports, it can make solar look less effective than it really is. Even if your feed-in credit seems small, that doesn’t mean your system isn’t saving you money. It means the self-consumed solar energy — the portion you used directly in your home — isn’t measured by the meter and therefore doesn’t appear on your bill.

This is why a single electricity bill often understates the real financial benefit of solar. For a more accurate understanding of how your solar is saving you money depending on the system you have you can refer to your solar tracking app such as the mySigen App, or setup your AlphaCloud app. These will give you a full breakdown of how your Solar + Battery system is powering your home.

Some is holding an ipad and the ipad is showing a data screen from the AlphaCloud battery app

You Still Pay the Daily Supply Charge

Even if you export more electricity than you import, you’ll still be charged daily supply fees — and if you’re on a time-of-use or controlled load plan, there might be more than one. In some cases, the supply charge alone can account for a third (or more) of your total bill.

Billing Mistakes with Solar Are Common

Not all electricity retailers handle solar exports accurately. If something looks off — for example, if your feed-in credits seem unusually low, or your export figures are missing altogether — it’s worth checking:

  • Your inverter’s export data
  • Your smart meter reads (if accessible)
  • Whether your FiT rate matches what your plan promised

Errors do happen, especially if your meter wasn’t properly reconfigured after installation.

Solar is a great investment, but it doesn’t eliminate your bill entirely — especially without a battery. The key is understanding how your solar generation and feed-in credits appear on the bill, and recognising that most of your savings are happening quietly in the background, powering your home without ever being recorded.

Why Your Bill Changes With the Seasons

Even if your energy habits stay the same, your electricity bill probably won’t. One quarter your usage looks normal — the next, it spikes. Or maybe your solar seems to carry you through summer, but not winter. This isn’t just you — it’s the season.

Energy Use Rises in Summer and Winter

For most homes, energy use increases during extreme temperatures:

  • In summer, air conditioners run longer and harder
  • In winter, heaters, electric blankets, and dryers get used more often

Even if you’re being energy-conscious, these appliances are some of the most power-hungry — and they can quickly drive up your usage.

Solar Performs Better in Summer

Solar systems generate more power in summer, thanks to longer days and more sunlight hours. This often helps offset higher summer usage — especially if you use power during the day and benefit from self-consumption.

But in winter, generation drops off:

  • Days are shorter
  • The sun is lower in the sky
  • Cloud cover is more frequent

This means your solar covers less of your usage, and you end up importing more from the grid — often just as your usage increases due to heating.

Comparing Bills Without Context Can Be Misleading

It’s easy to look at your last bill and think something’s gone wrong when it’s higher than the one before — but without checking the billing period, season, and weather, that comparison may not tell you much.

It’s more useful to compare the same season across years (e.g. winter this year vs winter last year), and to track your average daily usage, not just the total amount due.

Monthly vs Quarterly Billing — Why It Matters

If you’re only looking at the amount due on your bill, it’s easy to assume your energy usage has suddenly spiked. However, the frequency in which you are billed plays a big role in how high that number looks — and how much attention you should pay to it. 

Quarterly Bills Feel Bigger

Many electricity retailers bill quarterly — every 90 or so days. That means instead of getting a $200 bill every month, you might receive a $600 bill every three months. It’s the same amount of energy, but because it’s bundled together, it feels much more confronting.

This can catch people off guard, especially during high-usage periods like summer or winter.

Monthly Billing Can Feel More Manageable — But Still Adds Up

Some retailers offer monthly billing, which spreads your costs out over time. The bills feel smaller, but the total spend across the quarter may be exactly the same — or more if your usage creeps up.

That’s why it’s important not to compare one bill to the next by dollar amount alone. Instead, look at:

  • The billing period length
  • Your average daily usage
  • Seasonal trends (e.g. cooling or heating use)

Direct Debits Can Hide the Real Cost

If you’re on a payment plan that deducts money weekly or fortnightly, it’s even easier to lose track of what you’re spending overall. You might be paying $50 a week — but over 13 weeks, that’s $650 that has been taken off prior to how much is due on the first page of your bill.

Many households don’t realise how much they’re paying across a full quarter until they see the bill — and by then, the money’s already gone.

To stay in control, check:

  • Your current usage vs last quarter
  • Whether your payments are keeping pace with your usage
  • If you’re in credit, or at risk of falling behind

How to Spot Problems or Overcharging

Most people assume their electricity bill is correct — but that’s not always the case. Billing systems can make mistakes, solar configurations can be set up incorrectly, and rate changes can sneak in without notice. Here’s how to check if you’re being charged more than you should be.

Check the Meter Read Type

Look for terms like:

  • Actual read (based on meter data)
  • Estimated read (used when your meter couldn’t be accessed)

If your bill is based on an estimate — especially after a long time between reads — it may not reflect your real usage. Check whether the next bill corrects it, or if there’s a sharp adjustment.

If you have solar and the meter read is estimated, your feed-in credits may also be inaccurate.

Compare Rates to Your Plan

Bills don’t always make it easy to see what rates you’re being charged. But check carefully:

  • Are your usage rates (peak, shoulder, off-peak) what you signed up for?
  • Is your feed-in tariff correct?
  • Have any new fees or charges appeared?

If your provider has increased your rates, they should have notified you. It’s worth cross-checking your bill against your current plan details on the provider’s website. Feel as if you are being done badly by your energy provider? Check out another one of our articles on the best energy providers right now

Powerlines distributing electricity with text overlay saying "Best energy providers NSW 2025: Compare Plans & Rates"

Confirm Your Solar Exports Are Being Counted

If you have solar, check that your feed-in credits appear on your bill — and that they look reasonable. Compare the export figures on your bill with what your inverter or monitoring app shows.

If your system was recently installed or upgraded, make sure the meter was reconfigured correctly. It’s not uncommon for feed-in data to be missing entirely due to administrative delays.

Look for One-Off Spikes

Sometimes, one faulty appliance (like a pool pump, old fridge, or misconfigured hot water system) can drive up your usage. If your average daily usage has suddenly jumped, ask:

  • Did anything change in your home that month?
  • Is the spike consistent, or isolated to certain times of day?

Your retailer’s usage graph or online portal may help you spot patterns.

Don’t Ignore Small Errors — They Add Up

Even small discrepancies in daily supply charges or controlled load rates can cost you over time. If something doesn’t look right, contact your retailer and ask for an explanation. Keep your past bills handy so you can reference historical data.

Make Your Electricity Bill Work for You

Understanding your electricity bill isn’t just about knowing what you owe — it’s about learning how your home uses energy, spotting issues early, and making smarter decisions moving forward.

Once you know how to read it properly, your bill becomes a tool — not just a headache.

Here’s what to check each billing cycle:

  • Billing period — monthly or quarterly?
  • Average daily usage — is it trending up or down?
  • Rates — check your usage and feed-in tariffs
  • Supply charges — are you paying more than one?
  • Meter read type — actual or estimated?
  • Solar credits — are they showing up?
  • Total payments made — especially if you’re on direct debit

Your bill can tell you when your usage spikes, how well your solar is performing, and whether your current energy plan is still working for you. It can also reveal whether seasonal changes or subtle shifts in habits — like running the air con more or working from home — are having a bigger impact than expected.

Want help making sense of your bill — or figuring out how to lower it?
Send it through to us at Lenergy. We’ll take a look and help you understand exactly what’s going on, and what steps you can take to bring your costs down.

Lenergy staff member, Ziad standing in front of solar panels smiling

Adding a Battery to Your Solar: AC vs DC Coupling

Ever tried to make sense of how to add a battery to your solar system… and ended up with more questions than answers? You’re not alone. If you’re here, you’re probably trying to figure out how a battery actually fits into your existing solar setup — or whether you need to plan differently for a new install. And then someone throws around terms like “AC vs DC”, and it starts to sound more like a physics class than a home energy upgrade.

Solar panels generate direct current (DC) electricity, whereas household appliances operate on alternating current (AC). Batteries also store energy in DC form. So, somewhere between your roof and your appliances, something needs to convert, control, and manage the flow of power.

This is where the difference between AC and DC coupling comes in — and why choosing the right setup matters for efficiency, compatibility, and cost.

What Does It Mean to Add a Battery to Your Solar System?

When you install a solar system, your panels generate electricity during the day — but that energy only helps you while the sun’s shining. A battery changes that. It stores the excess solar energy your panels produce so you can use it later, like at night or during a blackout.

The challenge however, is that solar panels produce DC (direct current) electricity. Whereas your home runs on AC (alternating current) electricity. That’s why every solar system includes an inverter — to convert solar DC into usable AC.

Batteries also charge and discharge DC electricity, which means you need a system in place to manage how the power flows between your panels, your battery, your appliances, and the grid. That’s where AC and DC coupling comes into play.

There are two main ways to connect a battery to your solar system:

  • DC Coupling, where your solar panels and battery share a single hybrid inverter.
  • AC Coupling, where the battery and solar system each have their own inverter and work more independently.

Choosing between the two depends on whether you already have solar installed, how much flexibility you need, and whether efficiency or ease-of-retrofit matters more.

What’s the Difference Between AC and DC Electricity?

To understand how batteries connect to your solar system, you need to know the basics of AC and DC power — and why the difference matters.

A diagram showing the difference between AC couple battery systems and DC coupled battery systems

DC (Direct Current) electricity is the type of power that solar panels generate. It’s also how batteries store energy. The current flows in one direction, which makes it ideal for generating and storing energy.

AC (Alternating Current) electricity is what powers your home and the grid. It changes direction rapidly (50 times per second in Australia — that’s 50Hz), which makes it better for travelling long distances across power lines.

Since most household appliances are built to run on AC power, and solar panels produce DC, an inverter is essential. It converts the DC power from your panels into AC so your home can use it.

Batteries also need conversion.

Because batteries store power in DC and your home runs on AC, any system that includes a battery needs a way to manage those energy conversions — both when storing and using that power. The method used to handle this — whether through a shared or separate inverter — has a direct impact on how efficient the system is, how much it costs to install, and how flexible it will be in the future.

How Does DC-Coupled Battery Storage Work?

In a DC-coupled system, your solar panels and battery share a single hybrid inverter. This is often called a “one box” or “all in one” solution because it combines the functionality of a solar inverter and a battery inverter into a single unit.

Here’s how it works:

  1. DC from solar panels flows directly into the hybrid inverter.
  2. The inverter sends that DC either:
    • To your battery (still as DC) for charging, or
    • Through conversion to AC to power your home.
  3. When you need power at night, the battery discharges its DC energy, and the hybrid inverter converts it into AC for your household use.
  4. Some hybrid inverters can also convert AC from the grid back into DC to charge your battery — although this isn’t always standard.

Because the system avoids extra conversion steps (like turning DC into AC, then back to DC), DC coupling is generally more efficient. There are fewer “energy stops” along the way, which means less power is lost in translation.

But there’s a trade-off. DC-coupled systems rely on specific hybrid inverters that are only compatible with certain battery brands or models. If you’re installing both solar and battery at the same time, that’s usually fine. But if you’re planning to add a battery later, or want flexibility to upgrade, DC coupling may limit your options.

How Does AC-Coupled Battery Storage Work?

An AC-coupled system treats your battery as a separate unit — with its own inverter. This is known as a “two box” solution: one inverter for your solar panels and another for your battery.

Here’s what happens in an AC-coupled setup:

  1. DC power from the solar panels is sent to the solar inverter, where it’s converted into AC for use in your home.
  2. If your home doesn’t use all that energy, the battery’s inverter then converts some of the AC back into DC to store it.
  3. Later, when you need that stored power, the battery discharges as DC — and the battery inverter turns it into AC for your home.

Because the power is converted multiple times (DC → AC → DC → AC), AC-coupled systems are slightly less efficient than DC-coupled ones. Each step creates small energy losses.

That said, AC coupling has some clear advantages:

  • It’s ideal for retrofitting a battery onto an existing solar system.
  • It’s more flexible, because the battery system works independently of the original solar inverter. This means you can mix and match brands more easily.
  • It can also provide redundancy — if your solar inverter fails, the battery inverter can still function independently.

Some AC-coupled batteries, like the Tesla Powerwall 3, come with a built-in inverter. Others, such as Sungrow, require a separate battery inverter to be installed alongside them.

two side by side comparisons of a Tesla Powerwall 3 which text saying "in-built inverter" and a Sungrown battery with an inverter installed above with text highlighting this

DC-Coupled Batteries: Pros and Cons

DC-coupled systems make a lot of sense — especially if you’re installing solar and battery together from day one. Here’s a clear breakdown of the main advantages and drawbacks:

Pros

  • Higher Efficiency: Because there are fewer conversions between DC and AC, more of your solar energy is stored and used. That translates into better performance.
  • Lower Upfront Cost (for new systems): You only need one hybrid inverter, which reduces equipment and installation costs for new builds.
  • Bypasses Grid Inverter Limits: With only one inverter handling both solar and battery, you avoid Distributed Network Service Provider (DNSP) limits on total inverter capacity. This is especially useful in areas with tight restrictions (e.g. 5kW limits in parts of South Australia).

Cons

  • Compatibility Limits: Hybrid inverters usually only work with specific battery brands or models. That can lock you in — or limit your future upgrade options.
  • Not Ideal for Retrofits: If you already have solar installed with a standard inverter, switching to a hybrid system for DC coupling often means replacing your existing inverter — which adds cost and complexity.
  • Single Point of Failure: With only one inverter managing everything, if it fails, both your solar and battery go offline.

In short, DC coupling is efficient and streamlined — but it’s best suited for new solar + battery installs, not retrofits.

AC-Coupled Batteries: Pros and Cons

AC-coupled systems shine when you’re adding a battery to an existing solar setup — but they come with their own trade-offs. Here’s a look at where they excel, and where they fall short.

Pros

  • Easy to Retrofit: Already have solar? AC coupling lets you add a battery without replacing your current inverter.
  • Brand Flexibility: Because the battery system runs independently, you’re not locked into a specific inverter–battery combo. This opens up more product options.
  • Redundancy: With separate inverters for solar and battery, one can keep working if the other fails — handy for resilience and backup.

Cons

  • Lower Efficiency: Power gets converted multiple times — DC to AC, then back to DC to charge the battery, and then AC again to power your home. That creates small energy losses.
  • Higher Installation Cost (for new systems – Solar + a Battery): You’ll need two inverters — one for solar, one for the battery — which adds to the cost.
  • Inverter Capacity Limits: Some DNSPs count your solar and battery inverters together toward grid limits. So if your solar inverter is 6kW and your battery has a 5kW inverter (like the Tesla Powerwall 2), you might hit a 10kW cap per phase and be told no.

In summary, AC coupling is perfect for adding a battery to an existing solar system — just be aware of potential network limitations and slightly reduced efficiency.

Solar panels installed by Lenergy on top of tin roof with the sun reflecting off

Which Setup Is Right for You?

Choosing between AC and DC coupling isn’t about which one is “better” — it’s about which one suits your situation.

Here’s our simple rule of thumb:

If you’re installing solar and a battery together:

DC coupling is usually the smarter choice.
You’ll get higher efficiency, lower overall cost, and a simpler, all-in-one setup with a hybrid inverter. Just keep in mind the brand compatibility — your battery and inverter will likely need to be matched.

If you already have solar and want to add a battery:

AC coupling is typically the easier and more flexible option.
You can keep your existing solar inverter, choose from a wider range of batteries, and avoid replacing gear that’s still working well.

That said, it’s worth checking one important thing before you decide: your local network’s inverter limits. Some DNSPs limit the total inverter capacity per phase — and that might affect whether an AC-coupled battery is even allowed on your system. In those cases, a DC-coupled system may offer a workaround.

If you’re planning a new solar-plus-battery setup, DC coupling offers streamlined efficiency. If you’re retrofitting a battery, AC coupling is likely more cost-effective and flexible. Either way, understanding these options puts you in control of your energy future — and helps you avoid expensive mistakes.

Still not sure which setup fits your home best?

At Lenergy, we’ve helped hundreds of Australian homeowners navigate their battery options with honest, jargon-free advice. Whether you’re adding storage to an existing system or starting from scratch, we’ll walk you through it — no pressure, just clarity.

5 Practical Reasons to Add a Battery to Your Solar System

If you already have solar — or you’re thinking about installing it — you’ve probably wondered whether it’s worth adding a battery to your solar setup.

The truth is, batteries are becoming more popular for good reason. In this article, you’ll learn about five practical benefits of adding a battery to your solar, and why more Australian homeowners are making the switch.

In this article, you’ll learn what adding a battery does (and doesn’t) do, what it costs, how to access the new federal rebate, and how to tell if it’s worth it for you.

Use More of the Solar Energy You Generate

One of the most practical reasons for adding a battery to your solar system is simple: it lets you use more of the energy your panels produce.

Without a battery, your solar system powers your home during the day — but any excess energy goes straight back to the grid. At night, you buy power back from your retailer at a much higher rate.

With a battery, it works differently:

  • During the day, your battery stores any unused solar power.
  • At night, it supplies that stored energy back to your home.
  • You only draw from the grid if your battery runs out.
Sigenergy Battery install - outside of home

This increases your solar self-consumption — meaning more of the energy you generate actually gets used in your home. And with feed-in tariffs dropping and electricity rates rising, that shift makes a big difference to your bill.

If your panels are producing well but your bill still feels too high, this is often the missing link. Adding a battery to your solar setup lets you hold onto the value you’re already generating.

Protection from Rising Electricity Prices

Electricity prices in Australia have continued to rise. Since 1 July 2025, residential consumers in the default market offer areas have seen increases ranging from 0.5% to 9.7%, depending on their usage and location (dcceew.gov.au).

In this environment, adding a battery to your solar system becomes more valuable: you can rely more on the energy you’ve already generated, rather than paying more for grid power as prices climb.

Here’s how it works:

  • Your battery stores excess solar during the day
  • You use that stored energy in the evening, when electricity from the grid is most expensive
  • You only draw from the grid when your battery runs out

The result? Smaller bills and more control — especially if you use most of your energy in the late afternoon or evening when solar alone can’t cover your needs.

Tesla Powerwall 3 installed outside of home providing back up power

Backup Power During Blackouts

One of the most talked-about advantages of adding a battery to your solar system is backup power — and for good reason.

Most solar-only systems shut down during a blackout. But with a battery that includes backup capability, your home can stay partially powered even when the grid goes down.

Here’s what that can look like:

  • Keep essentials running — like your fridge, modem, lighting, or medical equipment
  • Avoid food spoilage during extended outages
  • Maintain internet access and basic comforts during storms or network failures

If you have three-phase power, you’ll need a battery system designed to back up all three phases — some only cover one, which may limit what stays on.

It’s also worth noting that not all batteries include backup functionality by default. So if this feature is important to you, make sure to confirm it when designing your system.

Whether you live in a rural area prone to outages or just want peace of mind, adding a battery to your solar gives you more energy independence when it counts most.

Access to New Government Rebates

If you’ve been put off by battery prices in the past, this might change your thinking.

From 1 July 2025, the Australian Government launched the Cheaper Home Batteries Program, offering eligible households a rebate to help reduce the upfront cost of installing a battery. The rebate amount depends on the size of the battery and where you live, but it can bring the total price down by thousands of dollars.

Lenergy helps customers apply for this rebate, and we always recommend checking the official program details yourself to ensure you’re eligible. You can read the full criteria on the government’s website: 

If you’ve been considering adding a battery to your solar system, this rebate could be the tipping point — especially when paired with long-term energy savings and blackout protection.

A Smarter Way to Future-Proof Your Energy Setup

Batteries aren’t just about storing power — they’re becoming the foundation for smarter home energy systems.

By adding a battery to your solar system, you’re setting yourself up for a future where:

  • You can participate in Virtual Power Plants (VPPs) and get paid for sharing stored energy
  • You can integrate your system with electric vehicle (EV) charging, using your solar to power your car
  • You have more control over how and when your energy is used — especially with smart apps and time-of-use automation
diagram of a VPP sending power to and from the grid. Highlighting the benefit of adding a battery to solar

If you’re already thinking about getting an EV or joining a VPP, having a battery makes it easier to take that next step. Some batteries can even be expanded later on if your energy needs grow — for example, if you add a pool, upgrade appliances, or start working from home more often.

It’s about more than just today’s savings. Adding a battery to your solar is a way to build flexibility, resilience, and long-term value into your home’s energy setup.

How Much Do Batteries Actually Cost in 2025?

One of the biggest questions people have when considering adding a battery to their solar system is: how much will it cost?

As of October 2025, here are the starting prices for some of the most popular home batteries installed by Lenergy:

  • ESY Sunhome Battery – from $9,210
  • Sungrow Battery – from $10,650
  • Enphase Battery – from $11,499
  • Sigenergy Battery – from $12,000
  • Tesla Powerwall 3 – from $15,800

Keep in mind:

  • These are starting prices and will vary depending on your system size, energy usage, and installation requirements
  • If you’re installing solar at the same time, some costs (like inverters or monitoring systems) can be bundled more efficiently
Lenergy staff member, Ziad standing in front of solar panels

Not sure which one fits your home? Most people choose based on a combination of budget, brand preferences, system compatibility, and whether they need full backup or VPP access. If you’re unsure, speaking with an installer can help match the right battery to your goals.

Is a Battery Right for Every Home?

While there are clear benefits to adding a battery to your solar system, it’s not always the right move for everyone.

Here are a few situations where a battery might not make sense — at least right now:

  • You use very little power at night: If most of your energy use is during the day and your bills are already low, a battery might not deliver a strong return.
  • Your solar system is small: If your system doesn’t produce much excess energy, there may not be enough surplus to charge a battery consistently.
  • You’re on a tight budget: Even with rebates, a battery is still a significant investment. In some cases, it might be smarter to maximise solar first and revisit battery storage later.
  • Your electricity rates are low: If you’re in a region or on a plan with low usage rates, the financial advantage of a battery could be smaller.

That said, many households still choose batteries for non-financial reasons — like blackout protection, future-proofing, or environmental values.

If you’re unsure, it’s worth speaking with an installer who can help you model your usage, solar output, and payback timeline. That way, you can make the decision based on real numbers — not just sales pitches.

What to Do Next if You’re Battery-Curious

Adding a battery to your solar system can be a smart, future-ready move — but it depends on your energy use, goals, and budget.

For many Australian homeowners, a battery helps:

  • Use more of your solar energy
  • Reduce exposure to rising electricity prices
  • Keep essential power running during blackouts
  • Access government rebates that lower the upfront cost
  • Prepare for a future with electric vehicles, VPPs, and more smart energy choices

That said, it’s not the right fit for every home — and that’s okay. The key is understanding how a battery fits your specific situation.

At Lenergy, we take a practical, no-pressure approach. If you’re curious about battery storage, we’d be happy to help.

How to Use the Tesla App to Monitor Your Powerwall

At Lenergy, we’ve helped hundreds of Australian families install and manage their Powerwalls. One of the most common things we hear afterwards is: “The Tesla app looks great — but I’m not really sure what I’m looking at.”

The Tesla App is powerful and well-designed, however, if you haven’t had someone walk you through it, it can be hard to know where to start. Some parts are intuitive, others are less obvious — and unless someone has explained things like Backup Reserve or Self‑Powered mode, it’s easy to miss features that could help you get more from your system.

In this article, you’ll learn how to use the Tesla mobile app to monitor and manage your Powerwall. From setup to backup settings to understanding what your battery is doing at any given moment — we’ll break it down, based on real questions we get from Lenergy customers.

By the end, you’ll feel confident using the app to stay informed, stay in control, and get the most out of your energy system.

Why the Tesla App Matters for Your Powerwall

Most of what your Powerwall does happens quietly in the background — charging, discharging, switching between solar and grid. The Tesla app is how you see what’s going on and, importantly, how you control it.

It shows you how your home is using energy in real time: what’s coming in from your solar panels, what’s being stored in the battery, what you’re drawing from the grid, and what’s being exported. This kind of visibility makes it much easier to spot patterns, track your savings, or troubleshoot when something feels off.

But the app isn’t just for monitoring — it’s where you adjust how the Powerwall behaves. For example, you can set aside backup power in case of an outage, or switch to Time-Based Control if you’re on a time-of-use electricity plan. These aren’t just nice-to-have features — they can make a real difference in how effectively your system works for your household.

The bottom line: if you want to get the full value out of your Tesla Powerwall, understanding the app is a big part of it. And once you know what each setting does, you’ll feel more in control of your energy use.

Getting Started: Installation & Setup

Before you dive into the features, it’s worth making sure your Tesla app and Powerwall are properly set up. Most of this is handled during installation, but here’s a quick rundown of what you (or your installer) should have completed:

1. Download the Tesla App

Head to the App Store or Google Play and search for the Tesla app. This is the same app Tesla uses for vehicles, solar, and energy storage — so if you already have a Tesla product, you don’t need a separate download.

2. Create Your Tesla Account

If you don’t already have one, you’ll need a Tesla account to log into the app. This is where your Powerwall system is registered, and it’s what connects your app to your specific hardware. Your installer will typically invite you to join or create your Tesla account during or shortly after installation.

3. Register the Powerwall

Your installer should link your Powerwall to your Tesla account. If that hasn’t happened or you’re taking over a system from someone else, you may need to submit a Powerwall registration request.

4. Connect to Wi-Fi

For the app to work properly, your Powerwall needs a stable internet connection. This is usually via Wi-Fi, but in some cases a wired connection or backup 4G dongle may be used. If your app isn’t updating regularly or is showing offline, this is the first thing to check.

5. Add Additional Users (Optional)

Want a partner, family member or property manager to have access? You can add another user through your Tesla account. Each person needs their own login — you can’t share a single account across devices.

Once the basics are set, the app will start displaying your system’s activity — including solar generation, home usage, battery charge level, and more. From here, it’s time to explore what the app can do.

Backup & Security Features

One of the biggest reasons people invest in a Tesla Powerwall is to keep the lights on during a blackout. The Tesla app makes it easy to manage this — and gives you a clear picture of how much backup power you actually have.

Backup Reserve

This setting lets you choose how much of your battery’s capacity to hold in reserve in case of an outage. For example, if you set your reserve to 20%, the Powerwall will stop discharging below that point — even if you’re using a lot of power — to make sure you’ve got something left if the grid goes down.

The right reserve level depends on your energy habits and your risk tolerance. Some homeowners set it low to maximise daily savings, while others prefer to keep more in the tank during storm season or in areas with unreliable power.

You can adjust your reserve level directly in the app:

  • Tap Settings > Backup Reserve
  • Use the slider to increase or decrease your backup threshold

If your Powerwall ever drops below this level, the app will let you know — so you can choose whether to reduce usage or allow it to dip into your reserve temporarily.

See more about the Tesla App back up reserve feature here

Storm Watch

Storm Watch is Tesla’s built-in safeguard for extreme weather. When enabled, it automatically prepares your Powerwall for outages by charging it to full capacity ahead of severe events like cyclones, thunderstorms, bushfires, or floods.

The system monitors weather alerts issued by the Bureau of Meteorology and will activate Storm Watch when a watch or warning is in place.

You’ll get a push notification when Storm Watch kicks in. From that point, your Powerwall will charge as quickly as possible to 100% to give you the best chance of riding out a grid outage. Once the weather risk has passed, your Powerwall returns to your normal settings.

How to Enable Storm Watch:
To turn it on:

  • Open the Tesla app
  • Go to Settings > Storm Watch
  • Toggle it on

Note: Storm Watch requires your phone to be paired with your Powerwall and Grid Charging to be enabled. This setting is usually configured by your installer, but if you can’t access it, contact your installer (like Lenergy) for assistance.

If a severe weather alert hasn’t triggered Storm Watch but you’d still like extra protection, the easiest option is to raise your Backup Reserve manually through the app.

See more information here on the Telsa App’s storm watch

Energy Optimisation Modes & Controls

Beyond just backing you up in a blackout, your Powerwall can also help you lower your electricity bills — especially if you’re on a time-of-use plan or generating more solar than you use during the day. The Tesla app gives you several ways to control how your battery behaves, depending on your priorities.

Self‑Powered Mode

This mode prioritises using your own solar energy instead of drawing from the grid. During the day, your solar panels power your home and charge the Powerwall. At night, your Powerwall discharges to supply your energy needs.

If your main goal is to use as little grid electricity as possible, Self‑Powered mode is a good default setting.

You can enable it by going to:

Settings > Open Powerwall Menu > Under Operational Mode, select Self-Powered

Then set your preferred Backup Reserve by adjusting the slider at the top of the screen

Time-Based Control

If you’re on a time-of-use electricity plan (where prices vary depending on the time of day), Time-Based Control helps your Powerwall charge and discharge strategically to avoid high-cost periods.

There are two options:

  • Cost Saving: Designed to reduce your energy bill, even if it means drawing from the grid occasionally.
  • Balanced: Aims to maximise your use of solar while still reducing grid costs.

To enable Time-Based Control, go to Settings > Powerwall > Operational Mode, then select Time-Based Control. From there, tap the Utility Rate Plan card to choose your tariff type (e.g. peak/off-peak or time-of-use). You can also adjust your Backup Reserve using the slider at the top of the screen to decide how much battery capacity to hold in case of an outage.

Once enabled, the Powerwall will begin learning your energy patterns — and over the following weeks, it will start making smarter decisions based on your usage, solar generation, and the tariff schedule you provide.

Advanced Settings

In addition to mode selection, you can adjust more detailed behaviours like:

  • Your energy rate plan (for time-based billing)
  • Whether or not to allow grid charging
  • Your minimum backup reserve, which interacts with whichever mode you’re in

Many of these features work well with the default settings, but if you’re confident using the app, you can adjust them to better align with your household’s energy usage and preferences.

If you’re unsure which settings to start with, we generally recommend enabling Self‑Powered or Balanced mode, then reviewing how your battery performs over a week or two. From there, you can tweak your preferences based on what you see.

Troubleshooting & Common Issues

While the Tesla app is generally reliable, you might occasionally run into issues — especially if your internet connection drops out or if your system settings were never fully configured. Here are some common problems and how to resolve them.

1. Powerwall Appears Offline

If your Powerwall isn’t showing any data or appears offline in the app, the most common cause is a loss of internet connection.

Check these first:

  • Is your home Wi-Fi working?
  • Has your router been moved or changed recently?
  • Has the Powerwall been disconnected from the network?

You can reconnect it by accessing your Powerwall gateway (typically located near your switchboard) or by contacting your installer for support. If the issue persists, Tesla support may need to re-establish the system connection.

2. App Not Updating or Showing Old Data

If the app isn’t showing current information, try force-closing and reopening it. Also check for app updates in your device’s app store.

If your phone is showing older energy data or nothing at all, it may be a sign that your Powerwall has lost connectivity, not that the app is faulty.

3. Need to Restart or Reset Your Powerwall

In rare cases, your installer or Tesla support may advise a system reset — for example, after a major firmware update or configuration change. This shouldn’t be done unless requested, but if needed, Lenergy can walk you through the process or send a technician.

What You Can Control, and What Tesla Manages

The Tesla app gives you more control than most people expect — from setting how your Powerwall responds to grid outages, to choosing how and when it charges and discharges. For many homeowners, that control translates into lower bills, greater energy independence, and peace of mind during extreme weather.

That said, not everything needs to (or should) be manually managed. Tesla’s systems are designed to handle most decisions in the background — learning your usage patterns, responding to your electricity tariff, and adjusting behaviour based on weather conditions. The app gives you the option to fine-tune, but it doesn’t demand constant attention.

If you’ve just had your Powerwall installed — or if you’ve had it for a while but haven’t explored the app — this guide should help you feel more confident navigating the features that matter most.

And if something still doesn’t look quite right, or you’re unsure how to adjust a setting, don’t hesitate to reach out. At Lenergy, we’re here to help you get the most out of your system — long after the installation is done.

Female Lenergy staff member standing in front of branded Lenergy sign